Blacklight Room Setup: 3 Essentials for Home and Gallery Glow
A blacklight room setup needs exactly three things to work: a UV light source, real darkness, and fluorescent materials for the light to hit. Skip any one and the effect falls flat. The fastest reliable route is a single feature wall lit by an RGBWA+UV par or a dedicated UV bar, in a blacked-out room, with white and neon decor doing the heavy lifting.
TL;DR:
- Using RGBWA+UV pars or UV bars at 2 to 4 feet from the wall ensures even lighting and maximizes glow effects while avoiding direct eye contact.
- Achieving total darkness requires covering windows, masking small device LEDs, and inspecting for light leaks, especially at night, to prevent ambient light from dulling the glow.
- Fluorescent materials like posters, tapes, and textiles glow brightest under UV light, with layered UV-reactive and phosphorescent props creating deeper visual impact.
- UV fixtures typically draw between 10 and 30 watts each, and a standard household circuit can handle six to ten fixtures safely, provided power is distributed correctly.
- Regular cleaning of fixture lenses and monitoring LED brightness ensure consistent glow quality, with LED fixtures fading gradually over years rather than needing bulb replacements.
Table of Contents
- The Three Essentials: What Actually Makes a Blacklight Room Work
- Choose Lights: Fixtures, Trade-Offs, and How Many to Buy
- Make the Room Dark: Blackout, Masking Lights, and Fixing Hot Spots
- Decor and Materials That Glow: Posters, Paint, Tape, Textiles, and Props
- Step-by-Step Setup Checklist You Can Follow in One Evening
- Safety, Exposure Limits, and Common Pitfalls to Avoid
- Applied Example: How FLY Miami Art Designs a UV Feature Wall
- Choosing the Right UV Light Wavelength for Optimal Fluorescence and Safety
- Electrical Considerations and Power Requirements for UV Lighting Setup
- Maintenance Tips: Cleaning UV Lights and Replacing Bulbs for Consistent Performance
- Effect of Room Surface Materials and Colors on UV Reflection and Overall Ambiance
- Equipment Options for Photography With UV Lighting (Camera Settings, Lenses, Filters)
- Lessons From Building Glow Rooms for Collectors and Shows
- How Flymiami Can Help You Finish the Room
- Selected How-To and Supplier Resources to Read Next
- Sources
The Three Essentials: What Actually Makes a Blacklight Room Work
Every glow room, from a college dorm to a gallery installation, runs on the same three ingredients. The UV source excites pigments that fluoresce; darkness removes competing light so your eyes only register the glow; fluorescent materials give the UV something to react against. Miss the darkness step and even a powerful fixture looks washed out.
Ambient light is the silent killer here. A sliver of streetlight through a curtain gap, or a router’s standby LED, can flatten the whole effect because your eyes adjust to that low light instead of the glow. The number of fixtures needed increases as room size grows, with small rooms typically using a handful of fixtures, medium rooms requiring more, and large event spaces using multiple fixtures often including premium units on stands.
That baseline holds whether you’re running fixed pars or portable bars.
Choose Lights: Fixtures, Trade-Offs, and How Many to Buy
Three fixture types dominate home and event setups, and each solves a different problem. RGBWA+UV LED pars are the most flexible option: they run full color washes for everyday use and switch to UV-only mode when it’s time to glow, which makes them the smarter first buy for multi-purpose rooms that need to look normal during the day. UV LED blacklight bars are cheaper and simpler. They only do UV, but they’re easy to mount along a ceiling line or baseboard for even wash coverage. UV strip lights fill in gaps and edges, useful for perimeter accents rather than as a primary source.
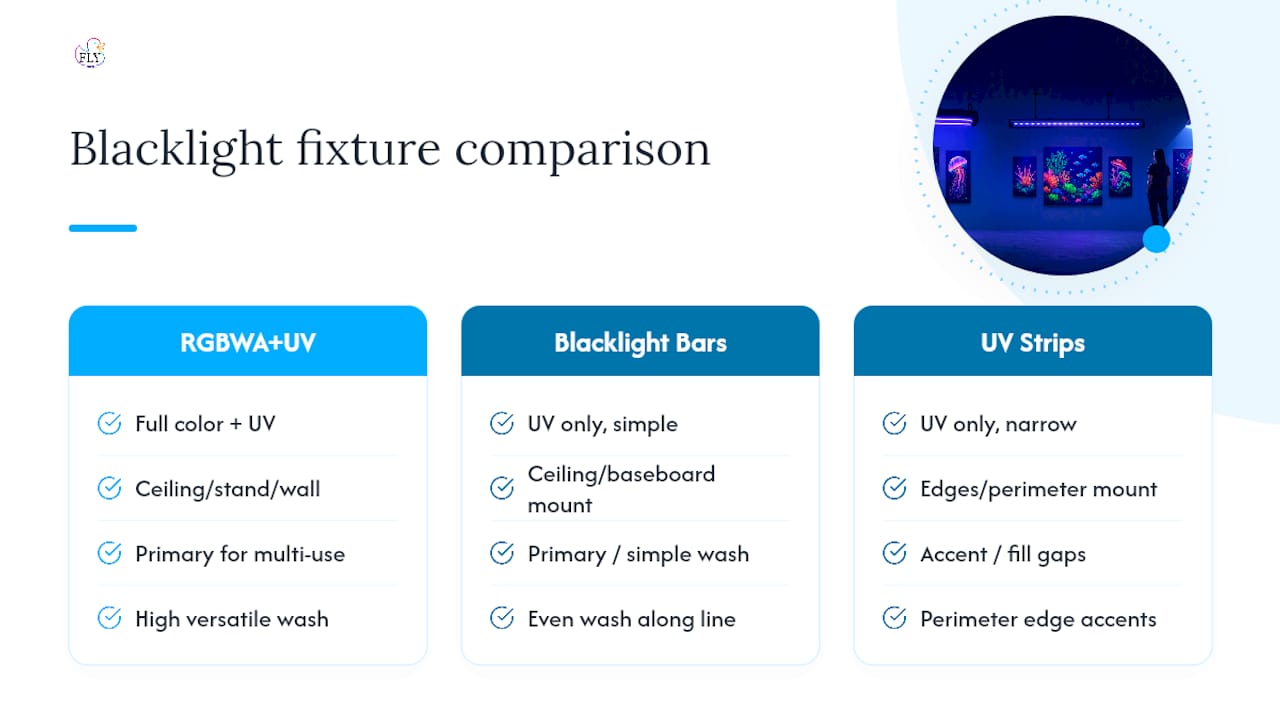
Mounting matters as much as the fixture itself. Keep UV lights 2 to 4 feet from the surface, aimed down and back at the wall rather than straight out into the room, and always below or above eye line so nobody gets a direct hit to the face.
For sizing, small home rooms typically need about five standard black lights, medium venues run 8 to 15, and larger spaces like gyms or event halls lean on premium units mounted on stands. If your room doubles as a living space, prioritize RGBWA+UV pars over single-purpose bars. You’ll spend more upfront but avoid buying twice.
Make the Room Dark: Blackout, Masking Lights, and Fixing Hot Spots
Darkness is a controllable variable, not a fixed condition of your room. Heavy blackout curtains or thick fabric panels handle windows permanently; temporary covers like moving blankets work fine for a one-night party. Foil is the internet’s favorite hack, but it’s usually overkill and it tears easily on removal.
- Cover window gaps first. Light leaks at the edges more than through the fabric itself.
- Tape over or unplug small device LEDs (routers, smoke detectors, chargers). These act as tiny light pollution sources that flatten contrast.
- Keep one dim, warm lamp in a corner for practical tasks like finding a drink or a phone.
- Walk the room at night and look for bright bands or dark gaps on your feature wall.
If a wall shows an uneven bright band, the fixture is too close or angled wrong. Back it off a foot or two, or add a second lower-watt bar to spread the coverage instead of relying on one strong source.
Pro Tip: Test your setup after dark, not during the day with curtains closed. Daylight tricks your eyes into underestimating how much ambient light is actually leaking in.
Decor and Materials That Glow: Posters, Paint, Tape, Textiles, and Props
White and neon materials fluoresce hardest under UV. Flocked velvet posters, UV-reactive inks, glow-in-the-dark stars, neon gaffer tape, and even highlighter ink on plain paper all react well, and white balloons or fabric will glow brighter than almost any other household item you own.
The best rooms mix two kinds of glow. UV-reactive pieces light up only while the blacklight is on; phosphorescent (glow-in-the-dark) pieces keep glowing after the lights go off, giving the room a second visual state once you kill power for the night. Layering both creates more visual depth than saturating one wall with a single material type.
- Neon flags or tapestries for scale and softness
- Glow tape outlines around furniture edges or door frames
- Skin-safe, UV-reactive body paint for parties (patch-test first)
- Balloons and neon textiles as fast, low-cost props
Fabric holds color longer than painted surfaces, which fade under repeated UV exposure. If you’re renting, use adhesive strips instead of nails to hang flags and posters.
Step-by-Step Setup Checklist You Can Follow in One Evening
Building a working blacklight room setup doesn’t take a weekend. Follow this order and you’ll avoid most of the trial and error:
- Pick one feature wall instead of trying to light the whole room. It’s the single most cost-effective design decision you can make.
- Measure the wall and plan fixture positions, 2 to 4 feet out, aimed down and back.
- Blackout the room. Cover windows and mask any small device LEDs.
- Hang posters, flags, or fabric on the feature wall before the lights go up.
- Position and power on the fixtures, then walk the room to check coverage.
- Run a final safety check: no fixture aimed at seating or eye level.
If the glow looks weak, check for ambient light leaks first, then reposition fixtures closer to the wall, then add more fluorescent props before assuming you need a stronger light.
Safety, Exposure Limits, and Common Pitfalls to Avoid
UV lighting for décor is generally safe at consumer wattages, but a few rules keep it that way. Never aim a fixture directly at faces or eye level, even briefly, and always use entertainment-rated fixtures rather than industrial or medical-grade UV sources, which run at intensities meant for sterilization, not ambiance. Limit continuous close-range skin exposure during parties, and offer a dim, UV-free “safe area” for guests who want a break or who are sensitive to strobing light.
Common mistakes worth checking before you flip the switch:
- Fixtures aimed straight into the room instead of down-and-back at the wall
- Forgetting to cover small LEDs on routers, chargers, or smoke detectors
- Using a single oversized fixture instead of multiple smaller ones for even coverage
- No warm safe light anywhere in the space
Applied Example: How FLY Miami Art Designs a UV Feature Wall
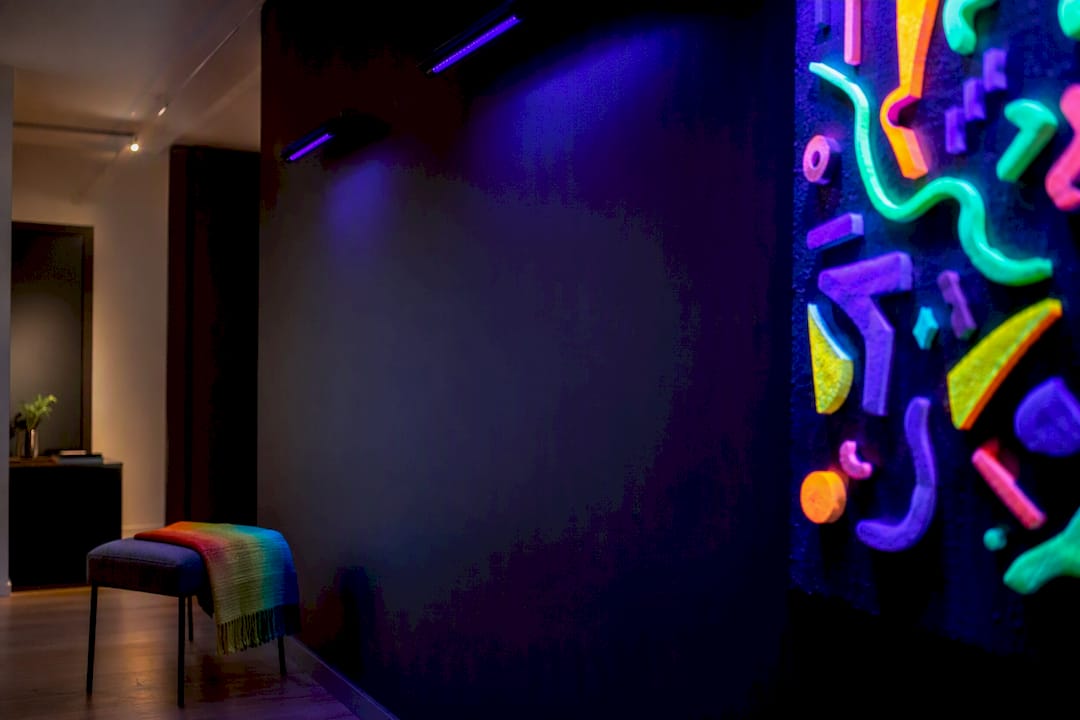
A gallery-grade glow wall follows the same logic as a bedroom setup, scaled up with more attention to composition. FLY Miami Art builds around one anchor piece first, sized to dominate the wall rather than compete with smaller accents, then layers texture and secondary props around it.
A central piece read as a gallery work when it’s framed in matte black and mounted slightly above eye level, with fixtures set back far enough to light the whole surface evenly rather than spotlighting the center.
Fixture distance follows the same 2 to 4 foot rule collectors use at home, adjusted for piece size. For care and long-term display, the studio’s glow piece lighting guide covers mounting height and distance in more detail, and the studio process page shows how a piece gets built to hold its glow over years, not one party.
Choosing the Right UV Light Wavelength for Optimal Fluorescence and Safety
Not all “blacklight” fixtures emit the same wavelength, and the difference changes both how well your decor glows and how safe the light is to be around. Most consumer UV fixtures fall into the UV-A range, roughly 365 to 395 nanometers. That band excites fluorescent pigments strongly while staying outside the more dangerous UV-B and UV-C ranges used for sterilization and industrial curing.
Fixtures closer to 395nm produce a visible violet tint alongside the UV output, which some decorators like because it fills the room with a soft purple glow even where nothing is fluorescing. Fixtures closer to 365nm produce less visible violet light and a “blacker” black, which makes fluorescent colors pop harder against a nearly invisible background beam. If your goal is maximum contrast for photos or a gallery-style feature wall, lean toward fixtures rated nearer 365nm. If you want a moodier, more ambient party glow, 395nm fixtures give you more usable light in the room itself.
Wavelength also affects safety margin. UV-A is the weakest form of UV radiation and the type most naturally present in sunlight, so entertainment-rated UV-A fixtures pose low risk at typical exposure times. Never substitute an industrial UV-C source, like a sterilization lamp, for décor. Those operate at wavelengths and intensities that can cause real skin and eye damage in minutes, not hours.
Electrical Considerations and Power Requirements for UV Lighting Setup
Most consumer UV fixtures, including RGBWA+UV pars and UV bars, draw between 10 and 30 watts each, so a standard 15-amp household circuit can typically run six to ten fixtures without issue. The math changes fast once you start mixing in premium units or running fixtures alongside sound equipment, fog machines, or other party gear on the same circuit.
Count your total draw before you commit to a layout. A power strip with built-in surge protection is worth the extra cost. UV ballasts and drivers can be sensitive to voltage spikes, and a cheap strip won’t protect them.
For rooms without enough outlets near the feature wall, a heavy-duty extension cord rated for the fixture load beats a daisy chain of smaller cords every time. Daisy-chaining multiple low-gauge cords is one of the more common reasons DIY setups trip breakers or, worse, overheat a cord under a rug or behind furniture.
If you’re running a larger event setup with eight or more fixtures plus DJ equipment, it’s worth having a dedicated circuit or asking whether the venue’s electrical panel can support the load before installation day, not during it.
Maintenance Tips: Cleaning UV Lights and Replacing Bulbs for Consistent Performance
UV fixtures lose output gradually, and dust is usually the first culprit. A thin layer of dust on the lens can cut visible glow noticeably before you’d ever notice a wattage drop on paper. Wipe fixture lenses with a dry microfiber cloth every few weeks in regular use, or before any event where the glow needs to look its sharpest. Avoid glass cleaners with ammonia, which can degrade some lens coatings over repeated use.
LED-based UV fixtures, which now dominate the RGBWA+UV par and UV bar categories, don’t use replaceable bulbs the way older fluorescent tube blacklights did. Instead, LED output fades slowly over thousands of hours, so the practical maintenance task is monitoring brightness over time rather than swapping bulbs on a schedule. If you’re still running an older fluorescent tube fixture, replace tubes when you notice a visible dimming or a flicker at startup. Both are early signs the tube is nearing end of life.
Store spare fixtures and tubes away from direct sunlight and moisture between uses, especially for seasonal setups like Halloween rooms that only run a few weeks a year. Heat and humidity degrade both LED drivers and fluorescent ballasts faster than normal use does.
Effect of Room Surface Materials and Colors on UV Reflection and Overall Ambiance
Wall color and material change how far UV light travels and how much of it reaches your decor. Flat white or light-colored walls reflect more UV around the room, which extends the glow’s reach but also softens contrast between your fluorescent pieces and the background. Dark walls, especially matte black paint, absorb most of the UV instead of bouncing it around, which is exactly why black paint is the standard backdrop choice for feature walls that need maximum contrast.
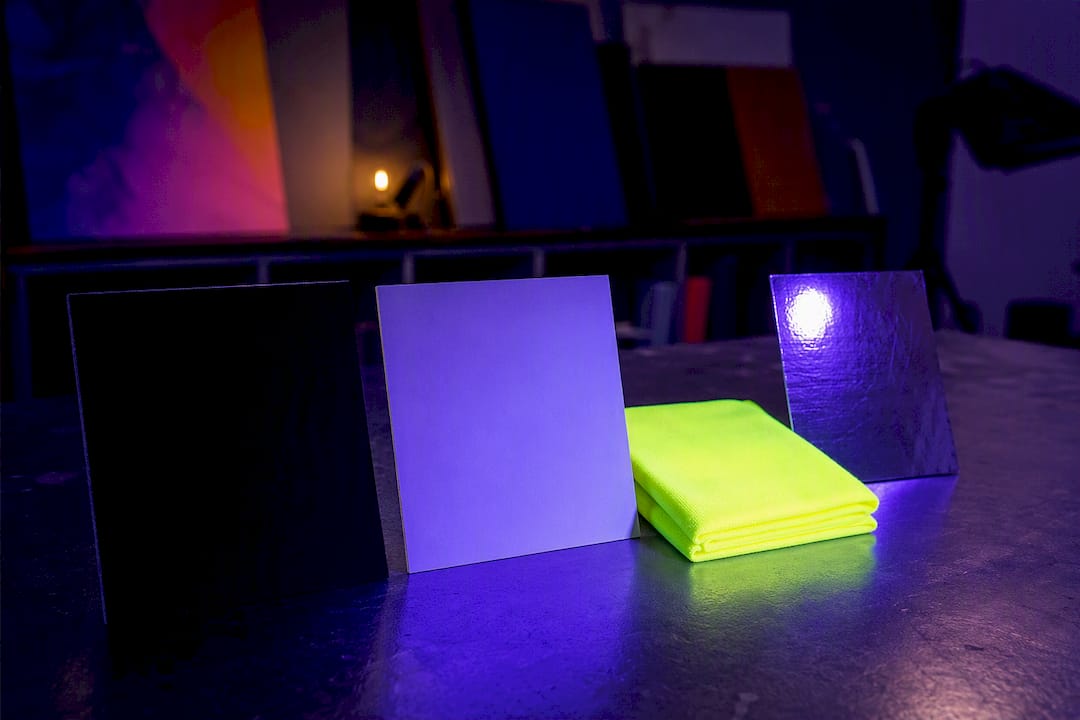
Glossy paint and reflective materials scatter UV unpredictably, sometimes creating unwanted bright spots on adjacent walls or the ceiling. Matte finishes give you more control because the light stays where you aim it.
Fabric absorbs and diffuses UV more evenly than painted drywall, which is part of why flocked velvet posters and hung textiles read as richer and more saturated than a painted mural using the same pigments. If your room has patterned wallpaper or textured surfaces, expect uneven glow across the wall since raised texture catches light differently than a flat panel. A smooth, matte black backdrop remains the most reliable base for any feature wall you want to look intentional rather than accidental.
Equipment Options for Photography With UV Lighting (Camera Settings, Lenses, Filters)
Shooting a glow room well takes different settings than a normal low-light shot. UV-reactive colors read as much brighter than ambient light suggests, so cameras metering for a “dark room” often overexpose the glowing elements while underexposing everything else.
Start with a wide aperture, f/2.8 or wider if your lens allows it, to pull in as much of the available light as possible without pushing ISO too high. ISO settings between 800 and 3200 usually work, depending on how many fixtures are lighting the scene, but push higher and grain becomes a real problem on most consumer cameras. Shutter speed matters most for moving subjects. Anything slower than 1/60 second risks motion blur if people are dancing or moving near the feature wall.
Standard kit lenses work fine for most home setups. No specialized UV lens is required for photographing a blacklight room, since you’re capturing visible fluorescence, not raw ultraviolet radiation. A UV-blocking filter (sometimes labeled a “haze” or “skylight” filter) can actually mute the effect slightly, since it’s designed to reduce UV interference rather than showcase it, so skip it for this kind of shoot. Shoot in RAW if your camera supports it. The dynamic range between bright fluorescent highlights and near-black shadows is wide, and RAW files give you far more room to recover detail in editing than a compressed JPEG.
Lessons From Building Glow Rooms for Collectors and Shows
Start with one wall. Every glow room that actually works began as a single, well-lit surface rather than an attempt to flood a whole space at once. Test at night, always, because daylight lies to your eyes about how dark a room really is.
Layering beats saturation almost every time. A wall with three well-placed pieces at different glow states reads richer than one crammed with fluorescent everything. That’s a lesson carried over from studio work and exhibition installs, where restraint usually outperforms excess.
— Facundo
How Flymiami Can Help You Finish the Room
If you’ve built the lighting and the blackout but the wall still feels empty, that’s where a piece of actual UV-reactive art does more work than another string of tape or a poster from a party store. Art pieces designed specifically for this kind of space often include sculptures and wall pieces layered with UV-reactive materials that reveal hidden patterns and colors only under blacklight, so the anchor piece on your feature wall does the same double duty your RGBWA+UV par does.

The UV glow art collection is the place to start if you want a ready-made anchor piece, and the broader wall art collection covers framed and sculptural options for rooms of different scales. If you’re planning a custom installation, the studio process page walks through how a commissioned piece gets built from concept to finished glow, and it’s worth a look before you request a quote so you know what to expect from the build timeline.
Selected How-To and Supplier Resources to Read Next
A few outside guides go deeper on fixture selection and party-specific setup than fits in one article:
- The complete blacklight and glow party setup guide covers fixture placement and troubleshooting in more detail.
- RGBWA+UV par fixture specs for readers comparing multi-purpose lighting options.
- Fixture counts for parties by venue size if you’re planning a larger event.
- Care and display guidance for anyone displaying a UV-reactive art piece long-term.
Sources
- UV Blacklight & Glow Party Ideas (Complete Guide) | KeoBin
- Blacklight
- Tips for black-light party | ProLightingRental
- SLLHUT DMX 6in1 RGBW+UV LED PAR Light — SuperLightingLED