50 Pounds? Hang Heavy Art Like a Museum for Homeowners
Weigh the finished piece first, including frame, glass, mat, and hardware, then commit to two-point hanging or a French cleat anchored into studs. Choose hardware rated to comfortably exceed the actual hung weight, allowing a generous safety margin. Very heavy pieces, especially those exceeding typical residential loads, or installations on uncertain wall conditions, are best handled by a professional installer. That’s the whole rule. Everything below explains why it works and how to execute it.
TL;DR:
- Weigh the artwork accurately by using a scale or summing all components, and select hardware rated at least twice the measured weight for safety.
- For wall anchors, prefer stud-mounted screws or lag screws when directly aligned with wall studs, and avoid relying solely on hollow-wall anchors above 50 pounds.
- Use gallery-grade methods like two-point D-ring hanging, French cleats, or rail systems to evenly distribute weight and prevent rotation or failure.
- Install hardware on at least two wall studs, ensuring cleats span multiple studs for heavy or wide pieces, and verify proper placement with a level before hanging.
- Hire a professional for pieces over 100 pounds or in difficult wall conditions like masonry, old plaster, or fragile materials to ensure secure and damage-free installation.
Table of Contents
- How to Weigh Your Art and Read Your Wall Before Hanging Heavy Art
- Which Anchors and Fasteners Work Best for Heavy Wall Art?
- What Are the Gallery-Grade Methods for Mounting Heavy Art?
- What Tools and Steps Do You Need to Install Heavy Art Safely?
- When Should You Hire a Professional for Heavy Art Installation?
- Does Humidity or Temperature Affect Heavy Art Hanging?
- How Often Should You Inspect Heavy Wall Art After Installation?
- How Do You Find Accurate Stud Locations and Spacing?
- A studio note on mounting large and specialty works
- Get Help Hanging Heavy Art From Flymiami
- Sources
- FAQ
How to Weigh Your Art and Read Your Wall Before Hanging Heavy Art
Most hanging failures start with a bad guess. Someone eyeballs a framed piece, assumes it’s “maybe 30 pounds,” and grabs whatever anchor is closest on the hardware aisle. Glass and framing materials can add significant weight to the piece, often more than one might expect. Home Depot’s guidance on hanging heavy pictures points to underestimated glass and framing weight as a leading cause of residential hanging failures.
Put the finished piece on a bathroom scale if it fits, or weigh yourself holding it and subtract your own weight. For oversized works, add up the frame, glass, mat, backing, and hardware separately, then total it. Once you have a number, professional installation guidance recommends choosing hardware rated at least twice that hung weight.
While you’re assessing the piece, check what’s holding it together. Factory picture wire is often underrated for heavy frames and can fail; professionals commonly recommend replacing it with rated D-rings and braided wire or mounting directly to D-rings without wire.
Then read the wall:
- Drywall over wood studs: the most common residential wall. Studs are typically 16 or 24 inches apart.
- Metal stud framing: common in condos and newer construction; requires self-drilling screws rather than wood screws.
- Plaster and lath: older homes, brittle surface that cracks easily around standard anchors.
- Masonry or concrete: brick, block, or poured concrete behind a thin finish layer.
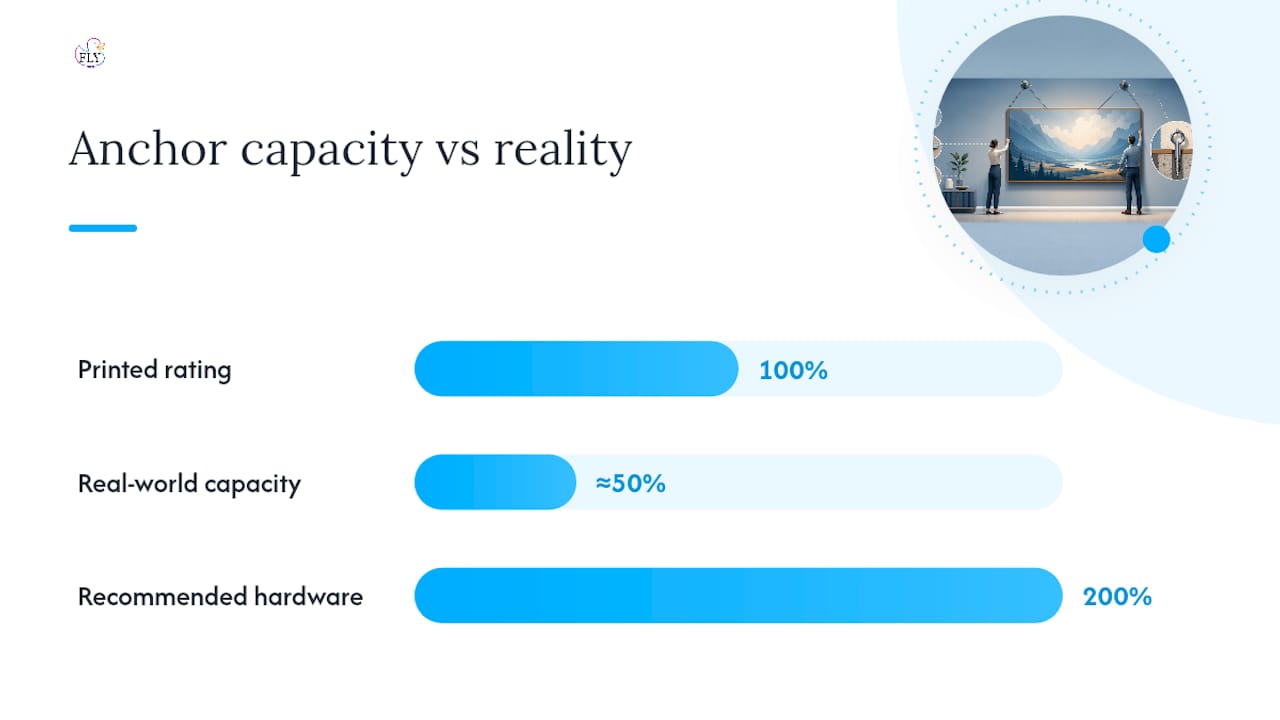
Using a stud finder is essential, and one with AC wire detection is recommended near electrical or plumbing to avoid hazards. Treat every anchor’s package weight rating as optimistic. This Old House notes that real-world capacity often runs closer to half the printed rating once you account for dynamic loads like bumps, vibration, and the wall material’s own variability.
Which Anchors and Fasteners Work Best for Heavy Wall Art?
The right hardware depends entirely on what’s behind the drywall, plaster, or masonry, not on what the box promises.
Stud-mounted screws and lag screws are the gold standard whenever a stud lines up where you need it. A properly sized lag screw driven into solid wood framing can carry well over 100 pounds on its own, though pros still pair it with a second fixing point rather than relying on one screw.
Snap toggles have become the preferred hollow-wall option over classic butterfly toggles, mainly because the metal channel stays behind the drywall permanently, letting you back out the screw and reinstall without losing the anchor. Strap toggles and standard toggle bolts work similarly but with less rehang flexibility.
Molly bolts and expansion anchors fill the mid-weight gap, generally best for pieces in the 20 to 40 pound range on solid drywall. They’re not the right call for anything heavier or for plaster, where the expansion action can crack the surrounding surface.
Masonry anchors, sleeve anchors, and Tapcon screws handle brick and concrete, but they demand the correct carbide-tipped drill bit and a light touch on torque. Overdriving a Tapcon into old mortar or brick face can shatter the material around the hole instead of seating cleanly.
Toggle-based hollow-wall anchors and heavy-duty toggles work for moderate weights on drywall, but above roughly 50 pounds, installers shift to studs or a French cleat spanning multiple studs rather than trusting a hollow-wall anchor alone.
For anything approaching that 50 pound threshold, or for a piece you plan to rotate often, a rail system or cleat mounted across studs beats a single wall anchor every time, because it spreads the load instead of concentrating it on one point.
What Are the Gallery-Grade Methods for Mounting Heavy Art?
Galleries and museums don’t hang heavy work on a single nail for good reason. They rely on systems that distribute weight and eliminate single-point failure.
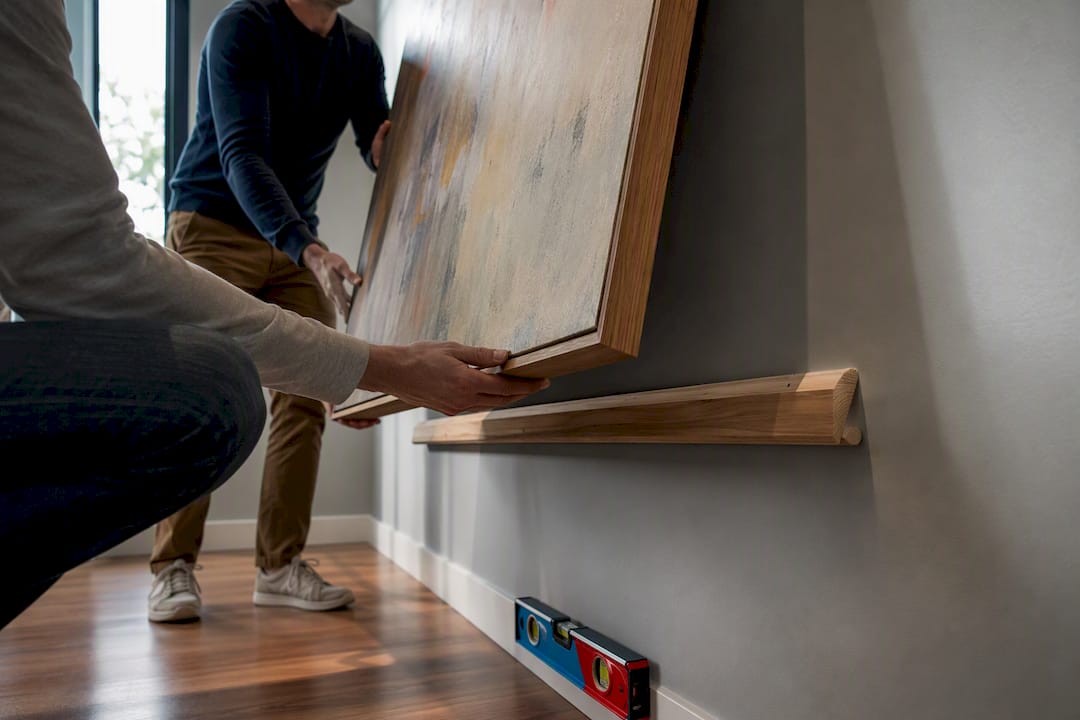
Two-point hanging replaces wire with two independent fixings, usually D-rings screwed directly to the frame at matching heights. This does two things a single center hook can’t: it keeps the piece from rotating out of level, and it means one hardware failure doesn’t send the whole piece to the floor. Wirecutter’s reporting on hanging techniques backs this up directly, noting that professionals generally avoid wire altogether for heavier frames in favor of D-rings or direct mounting.
French cleats are the workhorse for anything heavy. A cleat is a pair of interlocking beveled boards, one screwed to the wall across at least two studs, the other screwed to the back of the frame. Framing and hanging guidance from VanArtHub recommends cleats for pieces over roughly 50 pounds specifically because the wall-side board transfers weight into multiple studs at once rather than one anchor point.
Rail and cable systems suit collectors who rotate their displays. A track mounted near the ceiling holds cables with adjustable hooks, so heavy pieces can move or swap without new holes each time.
Direct-frame mounting works for very heavy or irregularly shaped pieces, screwing hardware straight into a reinforced frame rail rather than through a mat or backing board.
- Determine hung weight and pick a system: two-point D-rings for moderate weight, cleat for heavy or wide pieces, rail for rotating collections.
- Locate and mark at least two stud centers for the wall-side hardware.
- Level and secure the wall-side cleat or rail before ever touching the frame.
- Attach the frame-side hardware and test the fit before final hanging.
Pro Tip: Mount the cleat’s wall-side board so it spans at least two studs, even if the frame is narrow. A cleat anchored to only one stud loses most of its load-spreading advantage.
What Tools and Steps Do You Need to Install Heavy Art Safely?
Gather everything before you drill: a stud finder with wire detection, a wall scanner if you suspect old plumbing or electrical runs, a drill with bits matched to your anchor type, a torpedo level, a tape measure, a sturdy ladder, and a second person to hold the piece while you check placement.
- Mark the target height. A common guideline for hanging art is to position the vertical center at roughly average eye level, adjusting placement as needed for surrounding furniture.
- Measure the hardware position on the frame back. Note the distance from the top edge of the frame down to the D-rings or cleat, then transfer that measurement to the wall.
- Locate studs and mark pilot hole positions, sizing each hole to the anchor manufacturer’s spec, not a rough guess.
- Drill pilot holes and install anchors or lag screws, driving straight and avoiding overtightening, which strips drywall paper or cracks plaster.
- Hang one side, then the other, adjusting before fully tightening either fixing.
- Level the piece and check the gap between the frame and wall on both sides.
Once it’s hanging, do a load check. Apply gentle downward pressure and a slight side pull to confirm nothing shifts. Recheck the level.
- Confirm both fixings bear weight evenly, not one carrying the load while the other floats.
- Note the install date somewhere (a photo with a timestamp works) so you can track future inspections.
- Walk away, then come back in a day and recheck level and gap, since drywall anchors can settle slightly under load.
When Should You Hire a Professional for Heavy Art Installation?
Weight is the clearest trigger. Installation specialists generally recommend calling a pro once a piece approaches 100 pounds, and that threshold drops further for fragile or high-value works where a mistake isn’t just inconvenient, it’s expensive.
Wall surface matters just as much as weight. Tile, natural stone, and thin old plaster all behave unpredictably under drilling, and a cracked tile or a plaster blowout is far costlier to fix than the installation itself. Awkward shapes, oversized canvases, sculptural or dimensional works, and anything requiring rigging or a lift also point toward professional help.
A qualified installer brings load-rated anchors suited to your specific wall, proper rigging equipment for oversized or heavy pieces, and insurance that covers both the artwork and your walls if something goes wrong. Many also provide installation documentation, useful for insurance riders on valuable collections.
To brief an installer efficiently, have ready:
- Exact dimensions and total estimated weight of the framed piece.
- Photos of the wall and the intended location, including any visible outlets or vents nearby.
- Notes on wall type if known (drywall, plaster, masonry) and any existing hardware on the piece.
For guidance on staging and protecting oversized or sculptural pieces before an installer arrives, Flymiami’s notes on displaying large-scale installations cover common setup mistakes worth avoiding.
Does Humidity or Temperature Affect Heavy Art Hanging?
Wood frames expand and contract with humidity swings, and that movement puts slow, repeated stress on whatever hardware holds them. A frame that fits its cleat snugly in a dry winter can shift slightly in a humid summer, which is one more reason a two-point system with some tolerance beats a single rigid fixing.
Temperature swings near exterior walls, particularly in uninsulated spaces or rooms with big windows, cause the same expansion and contraction cycle over months and years. Drywall anchors set in a wall that experiences regular temperature stress can loosen gradually, even when the initial install was solid.
Vibration deserves more attention than most people give it. Homes near busy roads, homes with subwoofers or home theater setups, and multi-family buildings with shared walls all transmit low-frequency vibration that slowly works screws loose over time.
Rooms with major humidity swings, like those near kitchens, bathrooms, or unconditioned sunrooms, call for periodic hardware checks more often than a climate-controlled living room. If you’re hanging a piece in one of these zones, plan on inspecting the mount twice a year instead of once.
How Often Should You Inspect Heavy Wall Art After Installation?
A heavy piece that’s properly mounted doesn’t need constant attention, but it does need a routine. Check the hardware and level roughly every six months for average living spaces, and every three to four months in rooms with humidity swings, heavy foot traffic, or nearby vibration sources like a washer, dryer, or subwoofer.
During an inspection, look for three things: any visible gap change between the frame and wall, any tilt or drift from level, and any hairline cracking in the drywall or plaster around the anchor points. Small drywall dust on the floor beneath a piece is an early warning sign worth taking seriously, not ignoring.
Rehanging after a move is a good moment to swap out old wire for D-rings if the piece still has factory hardware, since wire degrades and stretches with age even when it looks fine. If a piece has hung in the same spot for several years, backing out one screw to inspect the anchor before reseating it takes a few minutes and catches problems early.
For collectors who rotate displays seasonally or swap pieces between rooms, Flymiami’s guidance on rotating pop art displays walks through safe rehanging habits that reduce wear on both the wall and the hardware over repeated moves.
How Do You Find Accurate Stud Locations and Spacing?
Standard residential framing places studs 16 inches apart on center, though older homes and some remodels use 24 inch spacing instead. A basic magnetic stud finder locates the screws or nails in the drywall, while an electronic stud finder detects the density change of the stud itself, which tends to be more reliable on textured or thicker walls.
Once you find one stud, measure outward in 16 inch increments to predict the next one, then verify with the stud finder rather than trusting the measurement alone. Corners, doorframes, and outlet boxes throw off spacing consistently, so always confirm near these features instead of assuming standard spacing continues.
For a French cleat, you want the cleat’s wall-side board to cross at least two stud centers, which sometimes means the cleat needs to be wider than the frame itself. Mark both stud centers on the wall before cutting or positioning the cleat, then double-check with a level so the cleat sits perfectly horizontal, since any tilt transfers directly to the hanging piece.
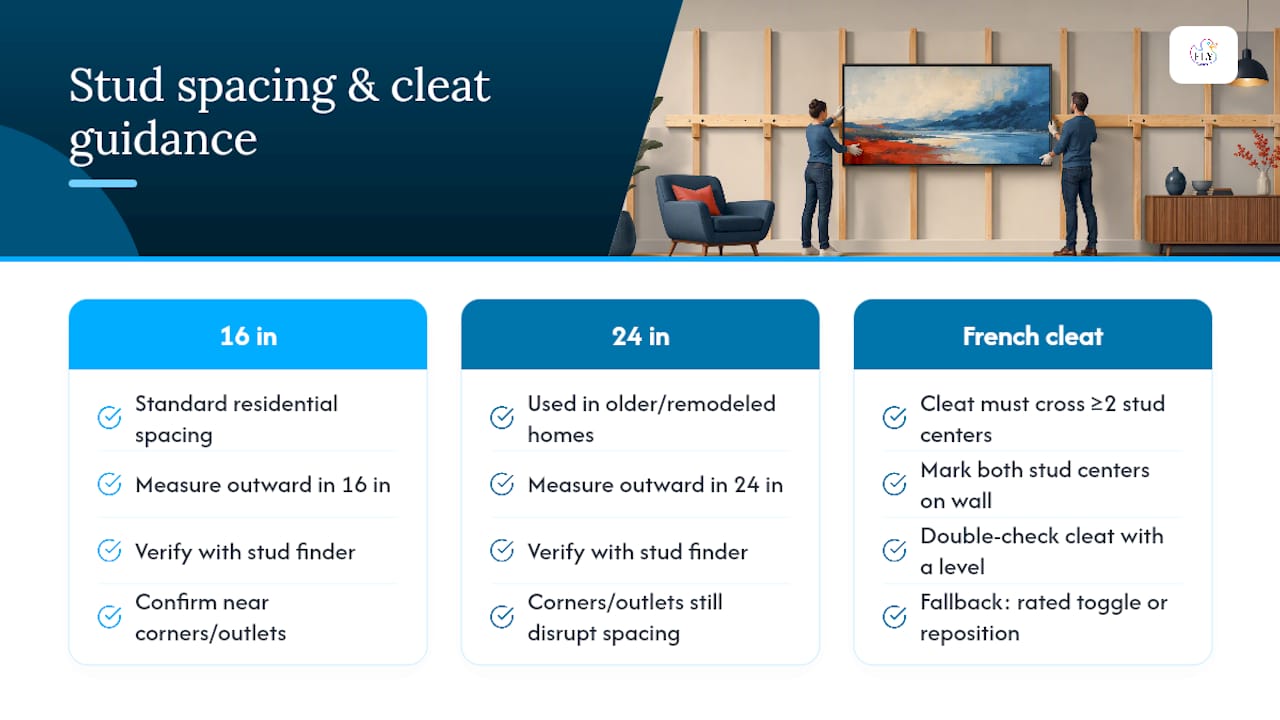
If you can’t find solid stud placement where you need it, that’s the moment to switch strategies entirely rather than force a weak fixing point. A heavy-duty toggle rated for the wall, or repositioning the piece slightly to land on real framing, beats compromising on anchor strength for the sake of exact placement.
A studio note on mounting large and specialty works
In the studio, we default to cleats for anything substantial, and we replace factory hardware without exception before a piece leaves for a client’s wall. It’s the difference between a piece that hangs securely for a decade and one that becomes a phone call nobody wants to make. For commissioned and UV-reactive works especially, we coordinate installation details directly with collectors, since blacklight setups and specialty mounts often need a slightly different plan than a standard frame. If you’re placing something unusually large or valuable, reach out before you drill.
— Facundo
Get Help Hanging Heavy Art From Flymiami
Flymiami sells wall art and sculptural pieces built for real walls, not just gallery lighting, and that includes guidance on how to mount them once they arrive. If you’re shopping for a statement piece rather than troubleshooting one you already own, browse the Wall Art collection for ready-to-hang works, or check the UV Glow Art collection if you’re planning a blacklight setup with its own mounting considerations.

Every piece leaves the studio with hanging hardware suited to its actual weight, not a generic hook, and commissioned works often come with input on wall type and placement before installation day. If you’re weighing a custom commission or an unusually large sculptural piece, request installation advice when you inquire and get guidance on wall type, hardware, and placement before anything ships.
Sources
For hardware testing and weight-band tables, see Austin Gallery’s guide to picture hangers for heavy frames. For professional installation technique and rigging thresholds, see ILevel’s guide to installing heavy art. For lighting and display technique that interacts with mounting choice, see WonderLens on shadow realism techniques.
- How to choose the right hanging hardware
- Framing and Hanging Large Art Safely | VanArtHub
- How to hang a heavy picture (Home Depot)
FAQ
What is the best way to hang heavy art?
Weigh the finished piece, then use two-point hanging with D-rings or a French cleat anchored into at least two studs, with hardware rated at least twice the hung weight.
How heavy of a painting can you hang on drywall?
Standard hollow-wall anchors and snap toggles handle moderate weights on drywall, but once a piece passes roughly 50 pounds, installers recommend anchoring into studs or using a cleat instead.
How do you hang a 100 pound picture?
At roughly 100 pounds, most professional guidance recommends hiring an installer, or at minimum using a French cleat spanning multiple studs rather than any single wall anchor.
How do you hang heavy art without studs?
Use heavy-duty snap toggles or strap toggles rated well above the piece’s actual weight, but treat this as a moderate-weight solution only. For anything heavier, repositioning to find studs or calling a professional is the safer route.